In today's fast-paced digital world, productivity has become synonymous with success. Whether you're a student, professional, or entrepreneur, effectively managing your time and tasks is essential for achieving your goals. Fortunately, technology offers a plethora of tools to aid in this endeavor, and one such tool that can significantly enhance your productivity is a screen recorder. With the ability to capture your screen activities, a screen recorder can be utilized for various purposes such as creating tutorials, documenting workflows, or collaborating with team members. In this comprehensive guide, we'll explore how you can harness the power of iTop Screen Recorder to streamline your productivity.
Understanding the Features of iTop Screen Recorder:
- High-Quality Recording: iTop Screen Recorder boasts high-definition video recording capabilities, ensuring crystal-clear playback of your captured content. Whether you're recording software demonstrations, presentations, or gameplay, the resulting videos will maintain exceptional visual clarity.
- Flexible Recording Options: The software offers flexible recording options, allowing you to capture the entire screen, specific windows, or custom regions. This versatility enables you to tailor your recordings to focus on the relevant content, eliminating unnecessary distractions.
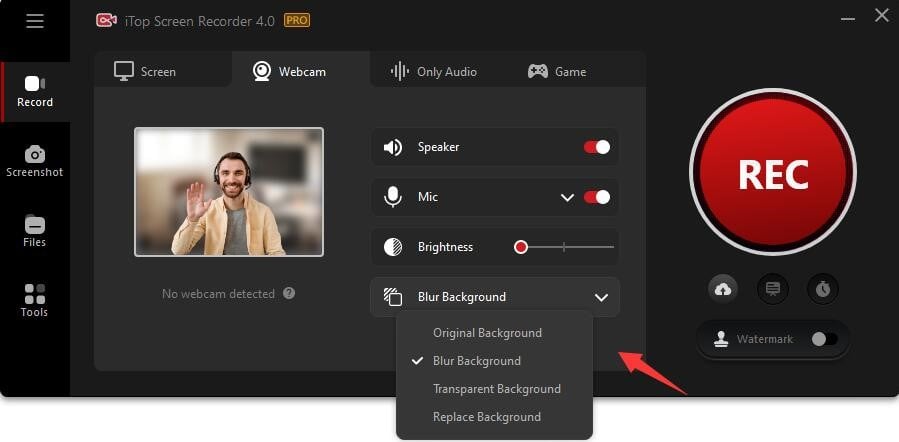
- Audio Recording: In addition to video recording, iTop Screen Recorder allows you to capture audio from your microphone or system audio. This feature is invaluable for narrating your recordings, conducting interviews, or including background music to enhance the viewer's experience.
- Annotation Tools: Enhance the effectiveness of your recordings with built-in annotation tools such as text, arrows, shapes, and highlights. These tools enable you to emphasize key points, provide additional explanations, or highlight important elements within your recordings.
- Scheduled Recording: iTop Screen Recorder offers the convenience of scheduled recording, allowing you to automate the process of capturing webinars, live streams, or online meetings. With this feature, you can ensure that important events are recorded even when you're unable to initiate the recording manually.
- Customizable Settings: Customize various recording settings such as video quality, frame rate, and hotkeys to align with your preferences and requirements. Personalizing these settings ensures optimal recording conditions tailored to your specific use cases.
- Video Editing: After recording, iTop Screen Recorder provides basic video editing features, enabling you to trim, merge, or add effects to your recordings. This integrated editing functionality eliminates the need for additional software, streamlining the post-production process.
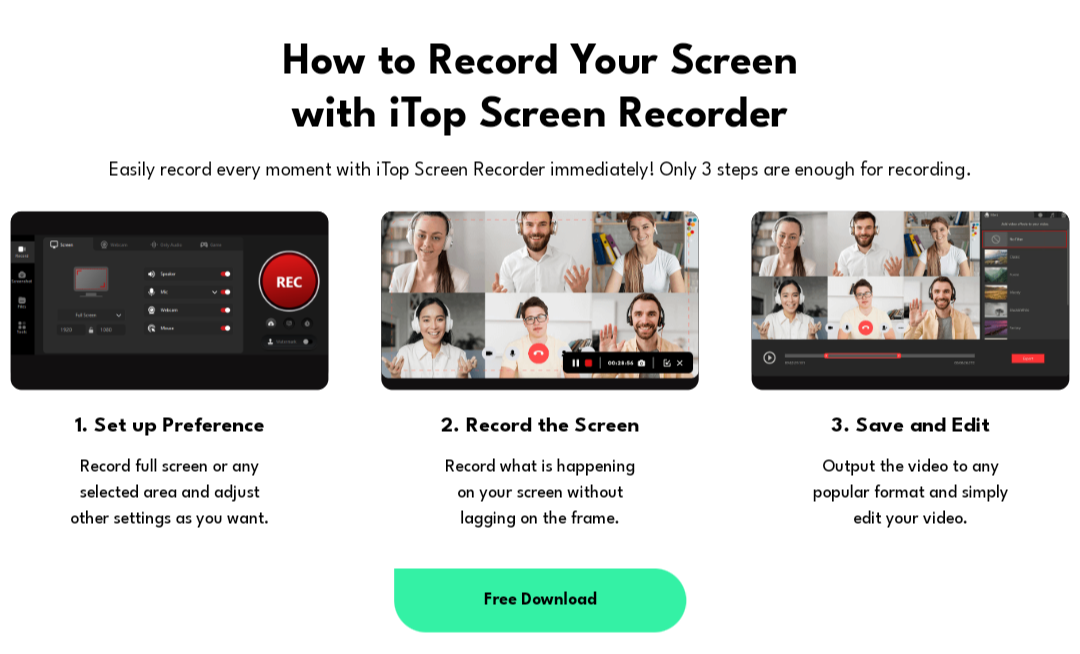
Tutorial: Maximizing Productivity with iTop Screen Recorder
Follow these step-by-step instructions to leverage iTop Screen Recorder effectively and enhance your productivity:
Step 1: Download and Install iTop Screen Recorder
Visit the official website here and download the iTop Screen Recorder application. Follow the on-screen instructions to install the software on your computer.
Step 2: Launch iTop Screen Recorder
Once installed, launch the iTop Screen Recorder application from your desktop or the Start menu.
Step 3: Select Recording Area
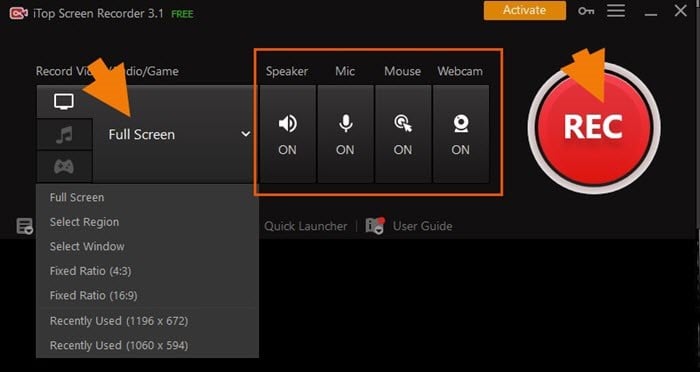
Choose the desired recording area by selecting one of the following options:
- Full Screen: Capture the entire screen.
- Custom Area: Define a custom region by dragging the mouse cursor.
- Target Window: Select a specific window to record.
Step 4: Configure Recording Settings
Before initiating the recording, adjust the recording settings according to your preferences:
- Video Quality: Choose the desired video quality and frame rate for optimal results.
- Audio Sources: Select the audio sources (microphone, system audio) to be captured during recording.
- Hotkeys: Customize hotkeys for starting, pausing, and stopping the recording process.
Step 5: Start Recording

Click on the "Record" button to commence the recording process. Alternatively, use the scheduled recording feature to automate recordings at specified times.
Step 6: Annotate and Highlight
During recording, utilize the annotation tools to enhance the clarity and effectiveness of your content. Add text, arrows, shapes, or highlights to emphasize key points or provide additional context.
Step 7: End Recording and Save
Once you've completed the recording, click on the "Stop" button to end the recording session. iTop Screen Recorder will automatically save the recorded video to the designated folder on your computer.
Step 8: Edit and Share
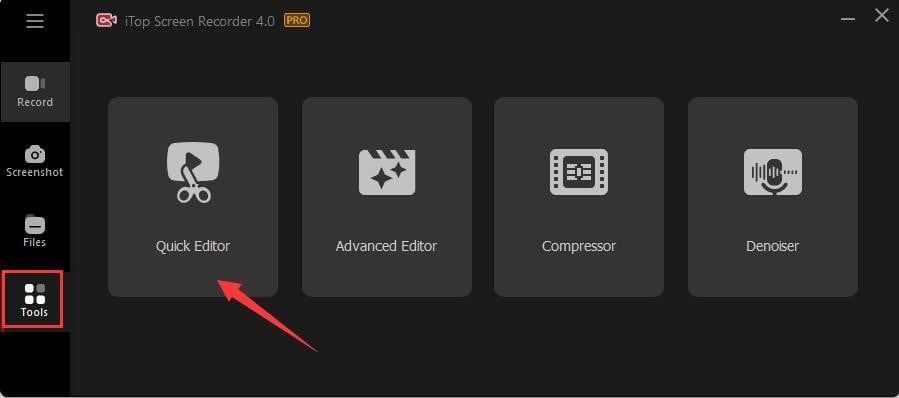
If necessary, utilize the built-in video editing tools to refine your recordings. Trim unwanted segments, merge multiple recordings, or add effects to enhance the visual appeal. Once satisfied, share your recordings with colleagues, clients, or friends to facilitate collaboration and knowledge sharing.
Advanced Tips for Maximizing Productivity:
- Utilize Keyboard Shortcuts: Familiarize yourself with the keyboard shortcuts available in iTop Screen Recorder to expedite the recording process. Assign custom hotkeys for initiating, pausing, and stopping recordings, allowing for seamless operation without interrupting your workflow.
- Experiment with Recording Scenarios: Explore different recording scenarios to leverage the full potential of iTop Screen Recorder. Whether you're creating instructional tutorials, conducting product demonstrations, or documenting software bugs, adapt the recording settings and techniques to suit the specific requirements of each scenario.
- Optimize Audio Settings: Pay attention to audio settings to ensure clear and consistent audio quality in your recordings. Adjust microphone sensitivity, system audio levels, and background noise reduction settings as needed to achieve optimal audio clarity.
- Collaborate with Team Members: Leverage iTop Screen Recorder as a collaboration tool by sharing recorded content with team members or clients. Whether you're providing training materials, sharing project updates, or seeking feedback, recorded videos offer a concise and engaging medium for communication.
- Integrate with Other Tools: Explore integrations with other productivity tools to streamline your workflow further. Whether you're integrating iTop Screen Recorder with project management platforms, communication tools, or content creation software, seamless integration enhances efficiency and facilitates seamless collaboration.
- Regularly Update Software: Stay updated with the latest versions of iTop Screen Recorder to access new features, performance improvements, and security updates. Regularly checking for updates ensures that you're utilizing the most advanced capabilities and maintaining optimal software performance.
- Seek Feedback and Iterate: Solicit feedback from colleagues, clients, or peers to identify areas for improvement in your recorded content. Analyze viewer engagement metrics, gather feedback, and iterate on your recording techniques to continually enhance the quality and effectiveness of your recordings.
Conclusion:
By incorporating iTop Screen Recorder into your productivity toolkit and implementing the tips outlined in this guide, you can elevate your productivity to new heights. Whether you're creating instructional materials, collaborating with team members, or documenting workflows, iTop Screen Recorder offers the features, flexibility, and usability required to achieve your goals efficiently and effectively.